Physical Address
304 North Cardinal St.
Dorchester Center, MA 02124
Physical Address
304 North Cardinal St.
Dorchester Center, MA 02124
We rely on our kitchen appliances every single day, but there is one that works non-stop, 24 hours a day, 7 days a week: the refrigerator. Think about it. Your stove only heats up when you are cooking, and your dishwasher runs for an hour or two before going to sleep. But your fridge never gets a vacation. It is constantly working behind the scenes to keep your milk cold, your vegetables crisp, and your leftovers safe from harmful bacteria.
Because it works so hard, it is easy to take this machine for granted until something goes wrong. A broken fridge means spoiled groceries, unexpected inconvenience, and potentially expensive repair bills. Fortunately, preventing a breakdown is much easier than fixing one. By learning a few basic refrigerator care tips, you can keep your appliance running smoothly for years, reduce your monthly utility bills, and ensure your food stays fresh for longer.
In this comprehensive guide, we will break down everything you need to know about maintaining your fridge. From simple weekly habits to deep-cleaning routines, these practical steps will help you get the most out of one of the most important ‘home appliances’ in your house.
The most important refrigerator care tips include keeping the temperature between 35°F and 38°F, cleaning condenser coils every six months, checking door seals regularly, avoiding overpacking, and cleaning spills quickly. Proper refrigerator maintenance helps improve energy efficiency, extend appliance lifespan, and keep food fresh longer.
Many homeowners assume that appliances do not need attention until they stop working. In many cases, waiting for a breakdown is the most expensive way to manage your kitchen. Regular refrigerator care acts like preventative medicine for your fridge.
When you take care of your appliance, you experience three major benefits:
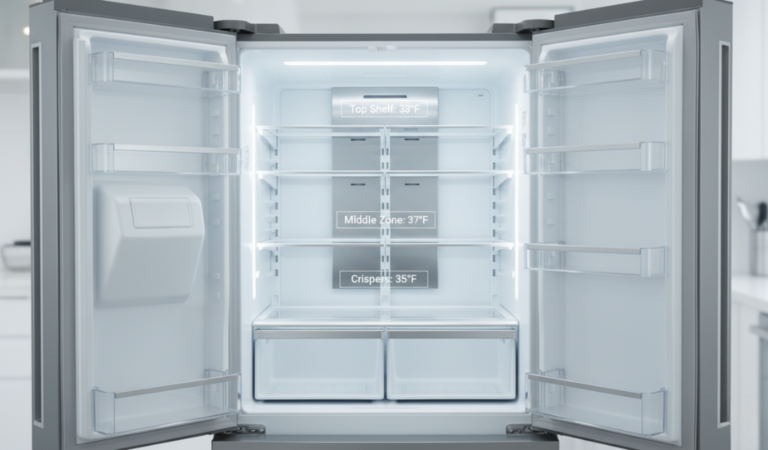
The primary job of a refrigerator is simple: slow down the growth of bacteria so your food stays safe to eat. To do this effectively, the internal environment must be kept within a strict temperature zone.
For standard residential ‘home appliances’, the magic number for your refrigerator is between 35°F and 38°F (1.6°C to 3.3°C). If the temperature creeps above 40°F (4.4°C), bacteria can begin to multiply rapidly, putting you at risk for foodborne illness. If the temperature drops below 32°F (0°C), you will start finding ice crystals in your milk, and your fresh lettuce will freeze and turn to mush.
For the freezer section, the rule is even simpler: keep it at 0°F (-18°C) or lower. This stops biological activity completely and preserves the texture and quality of frozen meats and vegetables.
Many older refrigerators do not display the actual temperature. Instead, they feature a simple dial labeled with numbers like 1 through 5, or settings from cold to coldest. These dials do not tell you the exact environment inside. Furthermore, as an appliance ages, its internal sensors can become less accurate. 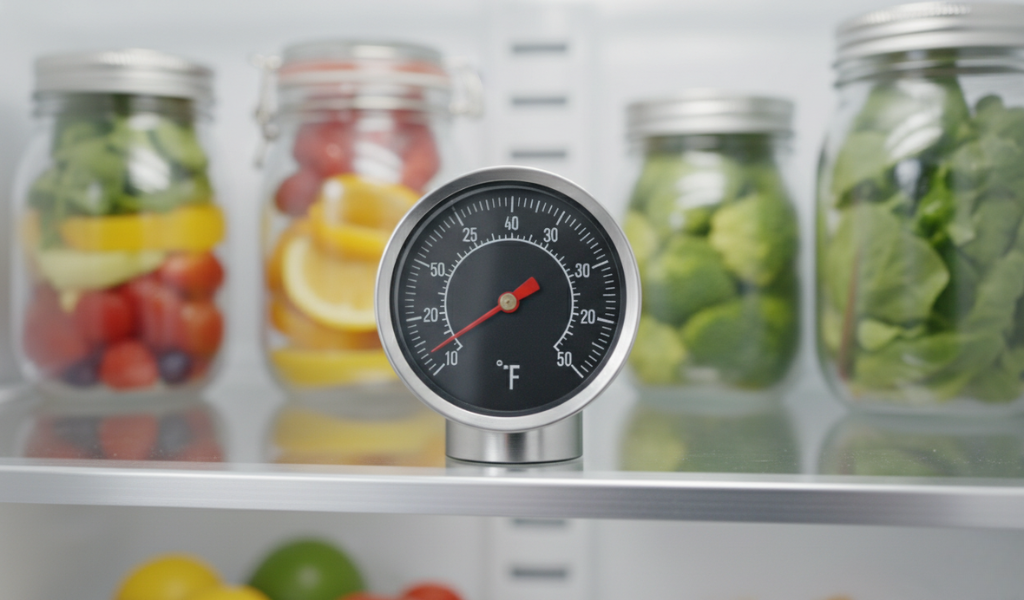
Therefore, one of the best essential refrigerator care tips is to buy a cheap, standalone appliance thermometer. Place it on the middle shelf near the center of the fridge. Check it once a week to confirm that your machine is delivering the exact cooling performance it promises.
Every time you open the refrigerator door, cold air spills out onto the kitchen floor and warm, humid room air rushes inside. The compressor must turn on to correct this change. To protect your food and your machine, practice the following habits:
Know what you want before you open the door. Avoid standing with the door wide open while deciding what to cook.
Let hot meals cool down on the counter before placing them in the fridge. Putting a steaming pot of soup directly into the refrigerator creates a sudden increase in internal temperature, forcing the appliance to work overtime and potentially warming up the surrounding groceries.
A clean refrigerator is a healthy refrigerator. Food spills left uncleaned can harbor mold spores and bacteria, which can easily migrate to other items. Plus, a cluttered fridge makes it incredibly difficult to see what you own, leading to wasted food and unnecessary door-open time.
You do not need harsh chemical cleaners to clean the inside of your fridge. In fact, strong chemicals can leave behind unpleasant odors that transfer into your fresh food. Instead, stick to a natural, gentle solution.
Did you know that different areas of your refrigerator have different temperatures? Organizing your food correctly is a core part of effective refrigerator care.
The doors are the warmest part of the entire appliance because they are exposed to room air every time the door opens. Do not store highly perishable items like milk or fresh eggs in the door bins. Instead, keep your milk on the bottom shelf near the back, where the air stays coldest and most stable. Use the door bins exclusively for shelf-stable items like condiments, salad dressings, and sodas.
To understand how to keep your appliance healthy, you need to understand how it cools. A refrigerator does not actually create cold air; it removes heat. A fan blows air over cold evaporator coils, and this chilled air must circulate freely through every corner of the cabinet to keep all items at a uniform temperature.
When you push too many groceries into your fridge or stack boxes tightly against the internal walls, you block the internal vents. This restriction stops the natural flow of air. As a result, you get dangerous hot spots in some corners, while objects right next to the cooling vents might freeze solid.
Even worse, the restricted airflow confuses the internal thermostat. The fridge senses that the main cabin is too warm, so it tells the compressor to stay on indefinitely. This wastes power and causes the entire system to overheat.
To keep air moving efficiently, aim for your refrigerator to be roughly 70% to 80% full. This leaves enough open space around your items for cold air to glide between them effortlessly.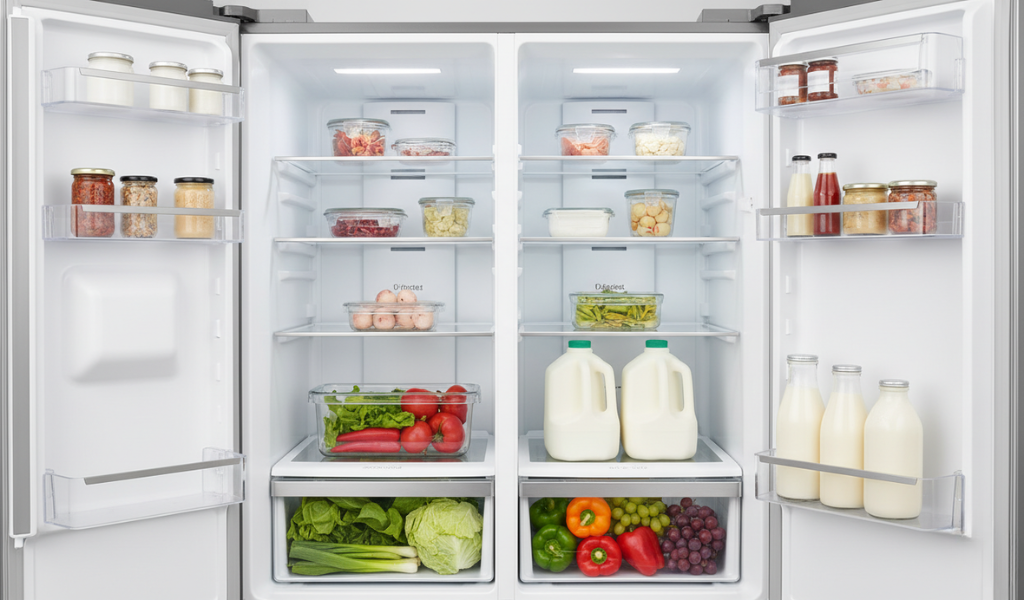
At the same time, avoid keeping your refrigerator completely empty. An empty fridge actually loses its cold air instantly whenever the door is opened. When your fridge contains a healthy amount of food, those cold items act like small ice packs, holding onto their low temperature and helping the appliance recover quickly after the door closes. If you do not have enough groceries to fill your fridge, simply place a few large jugs of tap water on the empty shelves to help stabilize the internal environment.
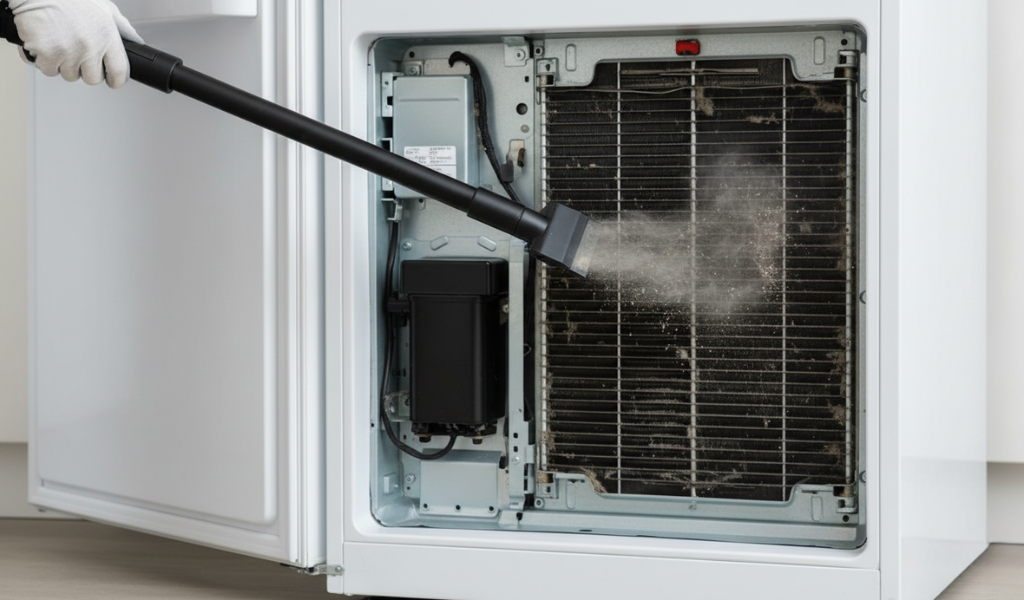
If you only focus on the inside of your fridge, you are missing the single most important mechanical component: the condenser coils. These large black loops are located either on the back of the appliance or hidden at the very bottom beneath a removable toe-grille.
The condenser coils carry hot refrigerant fluid away from the inside of the appliance. Their job is to release that heat out into your kitchen. At the same time, because these coils sit close to the floor or against the wall, they act like a magnet for dust, dirt, human hair, and pet fur.
When a thick layer of dust covers the coils, it forms an insulating blanket. The heat becomes trapped inside the coils, preventing the refrigerator from cooling down efficiently. This forces the motor to run non-stop, dramatically increasing your energy bill and shortening the life of your machine.
Cleaning your coils is a simple job that you only need to do every six months. If you have shedding pets like dogs or cats, you should perform this task every three months.
Disconnect the Power: For safety, always pull the refrigerator away from the wall and pull the power plug out of the electrical socket before starting any physical work.
Expose the Coils: If your coils are at the bottom, snap off the plastic front grille cover. If they are on the back, ensure the fridge is pulled far enough out so you have room to work comfortably.
Vacuum the Dust: Use the narrow crevice tool or a soft brush attachment on your household vacuum cleaner to gently suck up the accumulated dust webs and pet fur from the coils. Work slowly so you do not bend or puncture the metal lines.
Brush Away Stuck Debris: If you have thick, sticky dust buildup, use a specialized, inexpensive coil brush to sweep between the tight spaces, then vacuum up the loose dirt on the floor.
Restore Power: Slide the grille back into place, push the refrigerator back into position (leaving at least an inch or two of space between the wall and the fridge for air ventilation), and plug the power cord back in.
Have you ever noticed the thick, rubbery strip running along the inside edge of your refrigerator door? That is called the door gasket, or the door seal. Its job is to form an airtight barrier between your cold kitchen food and the warm room air outside.
Over time, this rubber piece can become stiff, warped, cracked, or coated in sticky food spills. When a seal fails, cold air continuously leaks out, while warm, humid air sneaks inside. This constant air leak can cause excess frost buildup inside your freezer and force the appliance to use more electricity.and forces your appliance to consume far more electricity than it should.
To make sure your door gasket is doing its job, look closely at the rubber strip all the way around the door. Look for any visible rips, splits, or areas where the rubber is sagging away from the metal door frame.
Next, perform a famous, simple check known as the dollar bill test:
If you feel a strong, firm resistance as you pull, your seal is in excellent condition. Still, if the bill slides out effortlessly with zero drag, or if it falls straight to the floor on its own, your gasket is too loose. Repeat this test at several points along the top, bottom, and sides of both the freezer and fresh food doors.
If your seal is dirty, clean it with warm water and a small splash of dish soap. Sticky syrups left on the door frame can glue the rubber to the metal; when you pull the door open, that stickiness can tear the rubber apart.
If the seal is clean but still leaking slightly, you can try using a hair dryer on a low, warm setting to gently heat up the rubber. The warmth makes the material pliable again, allowing it to expand and restore its original airtight shape. If the rubber is completely torn or brittle, you can easily order a replacement gasket online and install it yourself in minutes.
Your refrigerator represents a notable portion of your household’s total energy footprint. By integrating a few simple habits into your daily routine, you can maximize your appliance’s performance and save money on your utility bills simultaneously.
If you are planning a kitchen remodel or setting up a new home, pay close attention to where you place your refrigerator. Avoid installing it right next to major heat sources like your main cooking oven, a dishwasher, or in the path of direct, hot sunlight from a window. The exterior heat warms up the outer shell of the fridge, forcing the internal cooling mechanisms to work much harder to keep the interior cold.
Refrigerators are designed to sit almost perfectly level, with a very slight backward tilt. If you look at the bottom of the machine, you will find adjustable screw-threaded feet.
If your fridge tilts too far forward, the heavy doors will not swing closed on their own. They might hang slightly open without you ever realizing it. Adjust the front feet until the front of the fridge sits just a fraction of an inch higher than the back. This subtle slope ensures that whenever you walk away from the fridge, gravity pulls the door shut and seals it safely.
It can be tempting to use the top of your refrigerator as an extra storage shelf for heavy cookbooks, cereal boxes, or large kitchen bowls. However, many models release heat through the top and sides of their exterior cabinets. Stacking objects directly on top of the fridge blocks this heat dissipation, lowering its overall cooling efficiency. Keep the space around the exterior of the appliance clear to ensure proper airflow.
The freezer section requires its own unique approach to refrigerator care. If you have a modern, frost-free refrigerator, a built-in heater turns on automatically for a few minutes every day to melt away any small ice formations. However, if you own an older model or a manual-defrost chest freezer, you will need to manage frost accumulation yourself.
You should never let frost grow unchecked. When ice builds up to a thickness of one-quarter of an inch (about 6 millimeters), it begins to act like a wall of insulation over the internal cooling elements. This blocks the freezer from chilling your food efficiently, forcing the motor to work longer hours.
When it is time to clear out the ice, follow these simple steps to protect your appliance:
Critical Warning: Never use a sharp metal knife, screwdriver, or ice pick to scrape away chunks of ice from the walls. The internal cooling tubes run directly behind those plastic walls. If your knife accidentally punctures a line, you will release the chemical refrigerant gas instantly, which ruins the appliance permanently and requires a costly replacement.
If your fridge includes an automatic ice maker and water dispenser, remember that it relies on an internal water filter to remove sediment, chlorine, and impurities. Over time, this filter becomes clogged with microscopic debris, which slows down ice production and can cause your water to smell or taste strange. Change this water filter every six months to protect the internal plastic water valves from scaling and damage.
Most minor refrigerator issues can be solved at home with zero specialized tools. However, knowing the line between a quick DIY project and a major mechanical failure can save you time, frustration, and unnecessary expenses.
Your refrigerator is a reliable partner in your kitchen,working continuously to keep food cold, safe, and fresh. By spending just a few minutes every few months on simple tasks—like vacuuming the dust off your condenser coils, testing your door seals with a dollar bill, and keeping the interior organized—you can enjoy a quieter kitchen, lower utility bills, and an appliance that lasts for more than a decade.
Take a quick look at your fridge today. Is it jammed full of old items? Are the exterior ventilation spaces clear? Implementing even one or two of these easy refrigerator care tips today will pay off long into the future.
For most homes, cleaning the coils once every six months is perfect. However, if you have multiple pets that shed fur indoors, or if your kitchen is located in a dusty environment, you should inspect and vacuum the coils every three months to maintain top efficiency.
Water on the floor is usually caused by a blocked defrost drain line. When the automatic defrost cycle runs, the water cannot escape through the drain tube, so it fills up the bottom of the fridge and eventually spills out onto your kitchen floor. Clearing the small drain hole with warm water usually solves the issue instantly.
First, find and discard any spoiled or expired food items. Next, wipe down the internal walls with a mixture of two tablespoons of baking soda and warm water. Finally, place an open box of fresh baking soda on a middle shelf. The baking soda acts like a sponge, naturally soaking up lingering food odors over time.
It is usually not recommended unless you buy a model specifically rated for a garage. Standard residential refrigerators are designed to operate in environments between 60°F and 90°F. When the ambient temperature drops below 50°F, the appliance’s thermostat may stop cycling on, causing the freezer section to thaw out completely.
With proper care and routine maintenance, a high-quality modern refrigerator typically lasts between 10 and 13 years. Keeping the condenser coils free of dust and ensuring the door seals are airtight are the two best ways to maximize your appliance’s total lifespan.