Physical Address
304 North Cardinal St.
Dorchester Center, MA 02124
Physical Address
304 North Cardinal St.
Dorchester Center, MA 02124
There is nothing quite like the feeling of standing over a hot stove, watching a flat piece of dough suddenly expand into a beautiful, steam-filled balloon. If you have ever bought packaged flatbreads from the grocery store, you know they can often be dry, cardboard-like, and prone to cracking the moment you try to open them. However, when you learn a true, authentic pita bread recipe, you unlock a completely different culinary world.
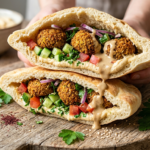
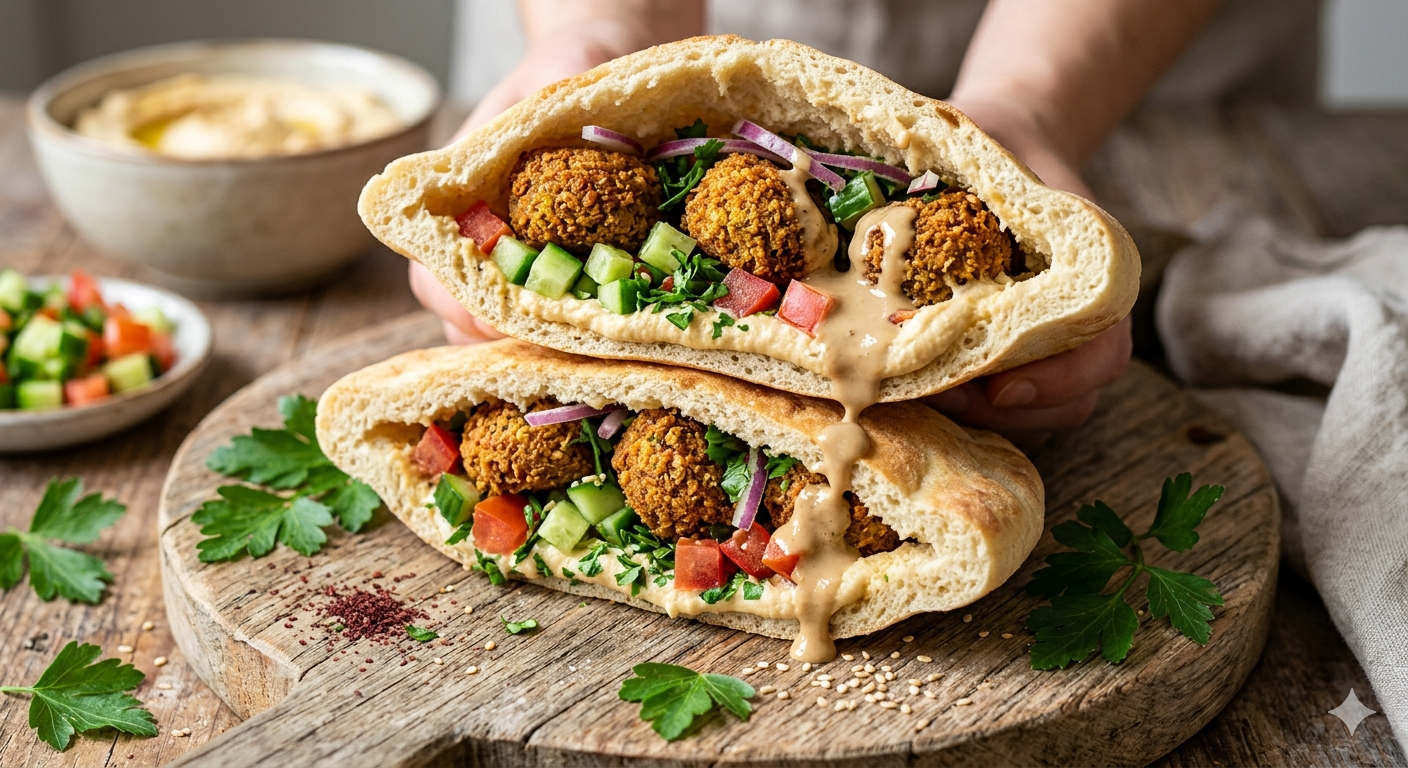
The perfect soft pita bread is not just an accompaniment to a meal; it is an experience. When made correctly, the pocket inside becomes a canvas for your favorite ingredients. Imagine a warm, pillowy pocket stuffed with crispy falafel balls, a rich smear of creamy hummus, fresh diced cucumbers, and a generous drizzle of nutty tahini. Every single bite offers a perfect balance of textures and temperatures. In this comprehensive guide, we will walk you through the simple science of yeast, the art of rolling, and the crucial step that guarantees an incredibly tender texture every time.
Pita bread is a soft Mediterranean flatbread made with flour, yeast, water, salt, and olive oil. It is cooked at high heat, which creates a steam-filled pocket inside the bread. Pita bread is commonly used for wraps, sandwiches, falafel, hummus, and grilled meats.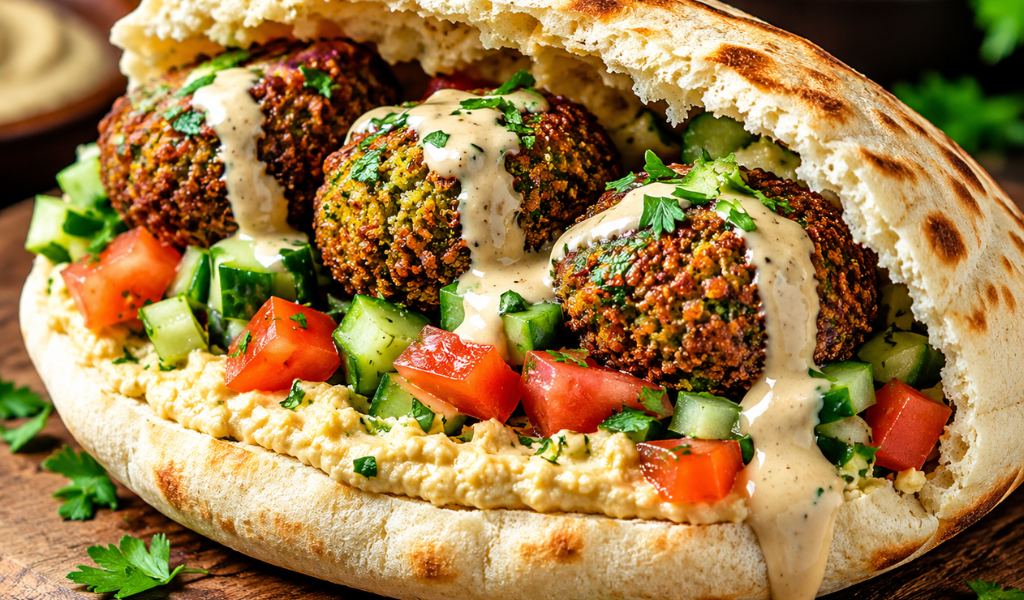
Before we jump into the flour and yeast, let us answer a fundamental question: what is pita bread exactly? At its core, it is an ancient type of leavened wheat flatbread that has been a staple of Middle Eastern and Mediterranean cuisines for thousands of years. Unlike western loaves, this unique bread is baked or cooked at incredibly high temperatures, causing the moisture inside the dough to turn rapidly into steam. This steam pushes the top and bottom layers apart, creating the iconic hollow pocket we all love.
Historically, people baked these flatbreads in clay ovens called tandoors or taboons. Today, you can get the exact same bakery-quality results right in your home kitchen using a standard cast-iron skillet or a very hot oven. The beauty of this food lies in its simplicity; it requires only a few basic pantry ingredients, yet it yields something truly magical.
To master this pita bread recipe, you need to understand how the dough behaves. The journey to a perfect soft pita bread relies heavily on two elements: moisture balance and gluten development.
When you mix your ingredients, kneading the mixture for a full ten minutes builds up a strong network of gluten strands. This network acts like a series of tiny rubber balloons, trapping the carbon dioxide gases produced by your yeast.
You do not need fancy kitchen imports to achieve incredible flavor. In fact, simple ingredients work best to let the natural fermentation shine through. Gather these components before you begin:
Let us walk through the process together. For this demonstration, we will use a standard stand mixer, but you can easily mix and knead everything by hand in a large bowl if you want a great arm workout!
In the bowl of your stand mixer, pour in your sugar, active dry yeast, and one cup of your lukewarm water. Give it a gentle swirl with a fork so the grains dissolve into the liquid. Let it sit undisturbed for about 5 to 10 minutes.
You will know it is ready when a thick, creamy layer of foam forms on the surface. If your mixture does not bubble or foam up, your yeast may be dead. Therefore, drop everything, buy a fresh packet, and start over—otherwise, your flatbreads will turn out dense and flat .
Attach the dough hook to your mixer. Turn the machine on its lowest speed setting and slowly add your flour into the yeasty water. As the machine turns, pour in your second cup of lukewarm water and the three tablespoons of olive oil.
Once the ingredients start sticking together and pulling away from the sides of the bowl, sprinkle in your salt. Let the mixer work steadily on low-medium speed for a full 10 minutes.
Pro-Tip on Consistency: Look closely at the texture. The ideal dough should feel incredibly soft, springy, and slightly sticky to the touch, but it should not stick to your fingers like glue. If it feels too dry or stiff, add a tiny splash of water—one tablespoon at a time. If it looks too wet, throw in a light dusting of flour.
Form the mixture into a neat ball, coat the inside of your bowl with a drop of olive oil, and place the ball back inside. Cover the bowl with a damp kitchen towel or a sheet of plastic wrap.
Let it rest in a warm, draft-free spot for about 30 to 60 minutes. If your house is quite cold, you might need to wait a bit longer until the mass visibly doubles in size.
While your yeast is working its magic, prepare your countertop workspace. Spread a large, clean, lint-free bath towel or a heavy tablecloth across your table.
On top of the cloth, arrange several precut squares of parchment paper, roughly 14cm x 14cm (5.5 x 5.5 inches) in size. You will need about 15 squares in total. Also, find a light blanket, muslin swaddle, or clean tea towels to cover the pieces later.
Once the rising time is up, gently punch down the center of the expanded mass to release any large pockets of trapped air. Lightly dust your countertop, your rolling pin, and your hands with a bit of extra flour.
Grab a portion of dough (Tennis ball size) ➔ Roll into a smooth ball ➔ Flatten with your palm ➔ Use a rolling pin to roll into an even circle (1/2 cm to 1 cm thick)
Gently wipe off any excess loose flour from both sides of your circle, then transfer it onto one of your parchment paper squares. 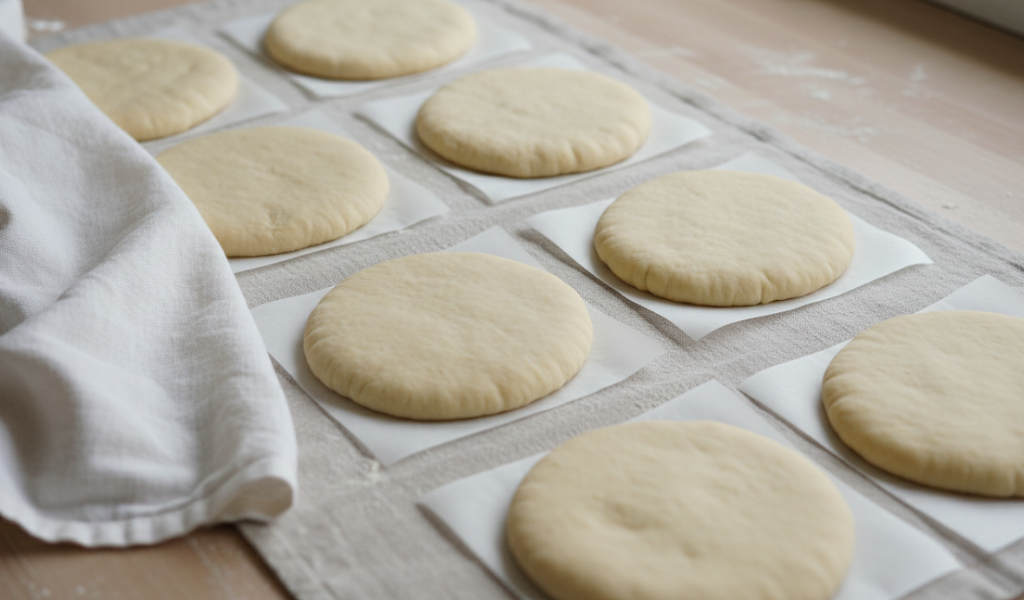 Press your fingertips down lightly around the edges to even it out, and cover it immediately with your tea towel. Repeat this process until you have shaped all 15 rounds. Let them proof undisturbed under the cloth for another 15 to 20 minutes to relax the gluten.
Now comes the most exciting part of this pita bread recipe: the bake! While you can use a blisteringly hot oven with a preheated baking stone, cooking them on a stovetop skillet gives you far greater control over the process.
Before turning on your stove, find a large pot, a clean cardboard box, or a plastic bin and line it with two thick, clean bath towels. This is your ‘moisture lock chamber’. This step is the single most important trick for making a truly perfect soft pita bread.
When a loaf comes off the heat, it is filled with boiling steam. If you leave it out on a wire rack, that steam escapes, and the dry air causes the crust to harden like a cracker. Stacking them together inside a tightly insulated towel box traps the hot steam, forcing the moisture back into the crumbs. This keeps your pockets incredibly soft and pliable for hours.
Get it Screaming Hot: Place a heavy cast-iron skillet or a non-stick pan over your stove on the highest heat setting. Do not add any butter, oil, or cooking spray; the skillet must be completely dry.
The First Flip: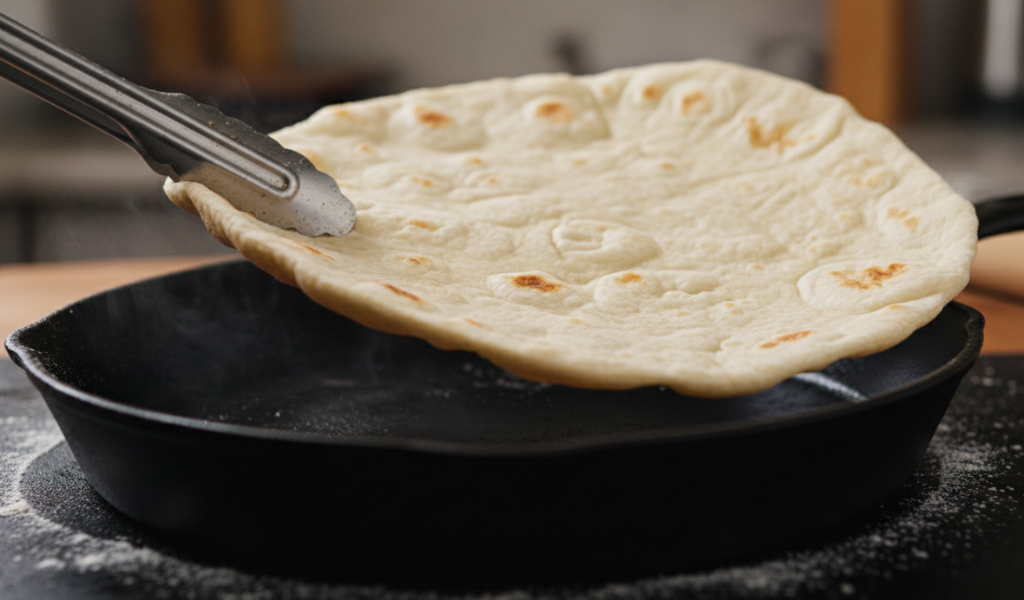 Carefully lift your first rolled circle off its parchment square and lay it flat onto the hot pan. Lower the heat setting slightly. Watch carefully . Within 20 to 30 seconds, you will see tiny, microscopic air bubbles forming on the top surface. The moment you see those bubbles, flip the bread over immediately!
The Development Stage: Let it cook on the second side for about one to two minutes until faint golden-brown spots begin to appear on the bottom.
The Final Puff: Flip it back over to the original side. Give it a few seconds, and suddenly, you will see the edges start to lift. The bread will begin inflating like a large balloon pocket. You can use a clean towel to gently press down on any areas where steam might be escaping, forcing the air to travel through the rest of the loaf.
The Transfer: As soon as it fully expands, carefully remove it from the skillet using tongs and place it straight into your insulated towel box. Close the towel lid tightly and do not peek inside until you are completely ready to eat!
If you manage to avoid eating all 15 loaves directly out of your towel box, you will be happy to know that homemade flatbread stores beautifully.
Allow the loaves to cool completely inside their towels so they do not sweat. Once they hit room temperature, slide them into a large plastic zip-top bag, squeeze out any excess air, and seal it tight. They will remain fresh, soft, and delicious on your kitchen counter for up to three days.
Homemade bread does not contain the chemical preservatives found in grocery store options, so it will mold if left at room temperature for too long. Luckily, pitas are the ultimate freezer-friendly food.
While they are still slightly warm from the pan, place them into heavy-duty freezer bags with a small square of parchment paper between each loaf to prevent them from sticking together. Pop them straight into the freezer. They will keep perfectly for up to three months. When you are ready to eat, simply pull a loaf out, let it thaw on the counter for ten minutes, and warm it up in a hot toaster or a dry skillet for 30 seconds. It will taste exactly like it was freshly baked!
Making an authentic pita bread recipe at home is a rewarding culinary journey. It transforms simple kitchen staples—flour, water, sugar, and yeast—into an incredible, pillowy flatbread that blows any store-bought alternative out of the water.
The secret to a perfect soft pita bread does not lie in expensive equipment or secret ingredients; it comes down to patience, even rolling, high cooking heat, and using the towel box method to trap that glorious steam. Once you master the technique of flipping your rounds at the exact right moment and watching them balloon on your stovetop, you will never want to buy plastic-wrapped flatbreads again.
Your Next Steps: This coming weekend, clear off your kitchen counter, prep your proofing station, and dive into making your own dough. Pair your warm, fresh pockets with some homemade hummus, grilled meats, or even a simple spread of chocolate hazelnut cream. You can now enjoy fresh homemade pita bread anytime you want !
This is the most common issue beginners face, and it usually happens for three reasons. First, your skillet or baking stone might not be hot enough; the heat must be intense to vaporize the water into steam instantly. Second, you might have rolled the dough unevenly, which lets steam escape from thinner spots. Finally, if you accidentally poke a small hole or scratch the surface with your tongs while moving the dough, the steam will leak out instead of expanding the pocket.
Yes, you can! However, whole wheat flour contains more bran and germ, which can cut through your gluten strands and make the flatbread denser. For the best results without losing that signature softness, we recommend using a 50/50 split of whole wheat flour and strong white bread flour. You may also need to add an extra tablespoon or two of water, as whole grains absorb more liquid.
If your loaves turn out like crackers, you either cooked them for too long over low heat, or you skipped the crucial towel box step. Cooking dough for too long evaporates all its internal moisture. Make sure your pan is very hot so the cooking process takes less than three minutes total, and transfer the hot bread into an insulated towel wrap immediately to trap the softening steam.
After your dough completes its initial 10-minute knead, you can place it into an oiled bowl, cover it tightly with plastic wrap, and store it in the refrigerator for up to 24 hours. The cold environment slows down the yeast activity significantly. This slow, cold fermentation actually allows the sugars in the flour to develop deeper, more complex flavors. When you are ready to bake, bring the dough back to room temperature for about an hour before dividing and rolling it out.
While both are popular global flatbreads, their ingredients and textures are quite different. A traditional pita bread recipe focuses on simple, lean ingredients like flour, water, yeast, and a little olive oil, resulting in a lightweight bread with a hollow pocket. Naan, on the other hand, is an enriched bread made with dairy products like yogurt, milk, and butter or ghee. This gives naan a much richer, softer, and cloud-like texture without an internal pocket.
While a heavy cast-iron skillet is highly recommended because it holds onto heat beautifully and mimics a clay oven, it is not strictly mandatory. You can use any heavy-bottomed frying pan, carbon steel pan, or even a high-quality non-stick skillet. The most important factor is ensuring the cooking surface is completely dry and thoroughly preheated before your dough touches it.