How to Grind Beef at Home Properly? Techniques, Tips, and Tools for the Home Chef
For any burger enthusiast, home cook, or culinary adventurer looking to truly elevate their kitchen game, there is one secret that stands head and shoulders above the rest: you must learn to grind beef at home. While the convenience of pre-packaged, plastic-wrapped meat at the local supermarket is undeniable, the massive difference in flavor, texture, and food safety when you take control of the meat grind yourself is nothing short of transformative.
In this comprehensive, deep-dive guide, we will explore the best way to grind meat by comparing various professional and DIY methods. From high-powered electric grinders to the humble but effective kitchen knife, we will help you achieve the perfect beef consistency for world-class burgers and savory tacos.
How to Grind Beef at Home
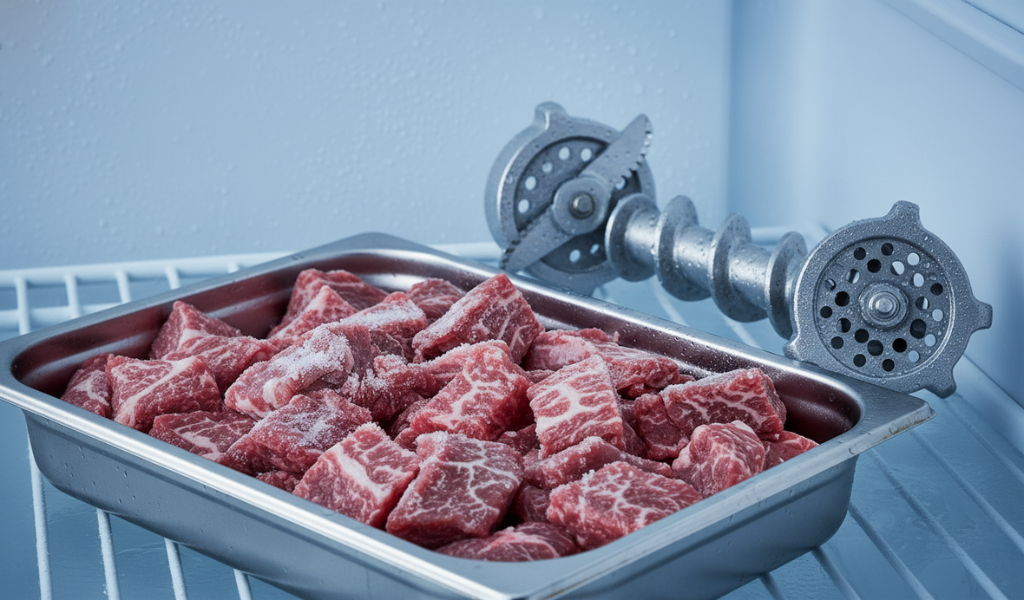
- Chill the beef and grinder parts before starting
- Cut meat into small cubes
- Use a meat grinder or food processor
- Grind using a coarse plate for best texture
- Keep everything cold during grinding
- Form patties gently without overworking
The Golden Rule: Temperature is Everything
 Before discussing the technicalities of how to grind beef, we must address the single most critical factor in the entire process: Temperature. Professional butchers and culinary scientists like J. Kenji López-Alt agree that heat is the enemy of a good grind.
If you attempt to grind room-temperature meat, you aren’t just cutting it; you are effectively mashing it into a paste. Beef fat, particularly the high-quality marbling found in chuck or brisket, has a surprisingly low melting point. As it warms up, it becomes soft, slippery, and elastic. When it passes through a grinder or a food processor at these ambient temperatures, the fat smears across the lean meat fibers instead of being sliced into distinct, cold pockets.
Why Chilling Matters:
- Definition and Clarity: Properly chilled fat stays solid and brittle. This results in a clean grind where you can clearly see individual flecks of white fat contrasted against the deep red lean meat.
- Structural Integrity: Smeared fat leads to a mealy, rubbery, and pulpy texture once cooked. In contrast, properly ground beef remains loose and aerated. This creates “nooks and crannies” that trap rendered juices during the searing process.
- Microbial Safety: Grinding increases the surface area of the meat, which can invite bacterial growth. Keeping the meat near freezing temperatures (around 30°F to 32°F) significantly inhibits this growth, ensuring your food stays fresh and safe.
Pro Tip: Do not just chill the meat. Place your beef cubes, the metal hopper, the blades, the auger, and the grinding plates in the freezer for at least 60 minutes before you begin. If the metal is cold to the touch, the fat won’t have a chance to melt upon contact.
Why You Should Stop Buying Pre-Ground Beef
If you examine a standard brick of store-bought ground meat, it often resembles a solid, compressed block of pink protein. This is because industrial grinding processes utilize immense pressure and high-speed machinery. Furthermore, to extend shelf life, commercial meat is often treated with carbon monoxide or packed in oxygen-free environments, which can mask the true age and quality of the beef.
The Downside of Store-Bought:
- Protein Compression: Because the meat is squeezed into tight packaging, the proteins begin to cross-link and bond. This results in a dense, bouncy burger that feels more like a sausage patty than a tender steak.
- The Mystery Factor: When you buy pre-ground meat, you are at the mercy of the supplier. It is often a mix of various trimmings from dozens of different cattle, which increases the risk of contamination and results in a generic, one-dimensional flavor profile.
- Moisture Loss: Because the fat is typically smeared during the high-speed industrial meat grind, it lacks the structure to stay inside the meat. The moment it hits a hot pan, the fat leaks out instantly, leaving you with a dry, shrunken puck and a pan full of wasted grease.
By choosing to grind beef at home, you ensure a loose, fluffy structure that allows for superior crust formation and a melt-in-your-mouth interior.
Choosing Your Beef: The Best Cuts for Grinding
The best way to grind meat starts long before you turn on the machine; it begins at the butcher counter. For most applications, especially the perfect American burger, you want a fat content of roughly 20% to 25%. If the meat is too lean, it will be dry; if it is too fatty, the patty will fall apart and flare up on the grill.
The Top Contenders:
- Beef Chuck: The undisputed king of the home meat grind. It is sourced from the shoulder and has a natural fat-to-lean ratio of about 80/20. It offers a classic, deep beefy flavor that everyone recognizes.
- Sirloin: This cut is exceptionally flavorful and steaky, but it is notoriously lean. If you use sirloin, it is best to blend it with a fattier supplemental cut to ensure the final product isn’t too tough.
- Short Rib: This is the secret weapon of high-end burger boutiques. It is extremely rich, well-marbled, and fatty. Adding 25% short rib to your mix introduces a luxurious, buttery mouthfeel that is hard to beat.
- Brisket: Brisket provides a distinct umami flavor and a slightly firmer chew. It’s a great addition to a custom blend if you want your burger to have a more complex, smoky undertone even before it hits the flame.
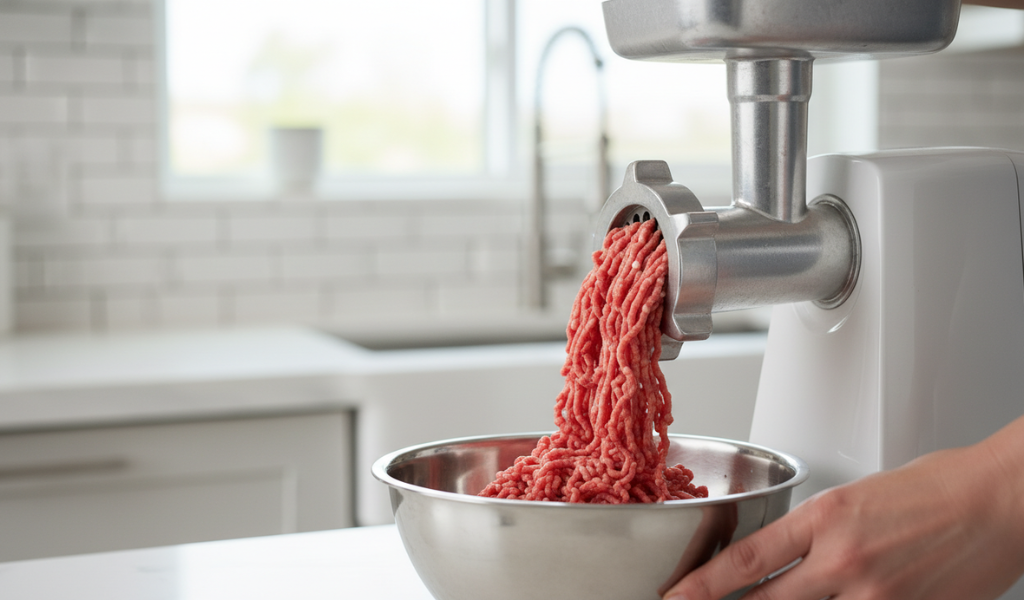
Method 1: Using a Meat Grinder to Grind Beef (Best Method)
Using a standalone electric grinder or a heavy-duty stand-mixer attachment is the most efficient and consistent way to process large quantities of beef. It is designed specifically to shear through muscle and fat with minimal friction.
Step-by-Step Execution:
- Preparation: Cut the beef into 1-inch to 1.5-inch cubes. Use a sharp knife to remove any silver skin—that tough, iridescent connective tissue—as it can wrap around the grinder blade and cause a blockage.
- The Deep Chill: Spread the cubes in a single layer on a baking sheet and freeze until the edges are firm and starting to frost, but the centers are still slightly yielding.
- The Grind: Set your machine to a medium-high speed. Feed the meat into the hopper at a steady pace. Use the plunger to guide the meat, but never force it. If the meat stops flowing freely, stop the machine and check for clogs.
- Plate Choice: Grinders usually come with a Fine (3mm) and Coarse (6mm-8mm) plate. For burgers, the coarse plate is almost always superior because it maintains the integrity of the muscle fibers, leading to a lighter, juicier texture.
The Result: You get a uniform, professional-grade texture that is ideal for forming loose, high-end patties.
Method 2: The Food Processor (The Convenient Alternative)
If you don’t own a dedicated grinder, do not despair. Your standard kitchen food processor is a surprisingly capable tool, provided you use the pulse method rather than the on switch.
The Pulsing Technique:
- Partial Freezing: This is non-negotiable for the food processor. Because the blades spin so fast, they generate heat. Place your 1-inch beef chunks in the freezer for about 20–25 minutes until they are “crunchy” on the exterior.
- Work in Batches: Never fill the processor bowl more than halfway. For a standard 10-cup processor, grind about half a pound at a time. This ensures every piece hits the blade evenly.
- Pulse, Don’t Puree: Use short, sharp 1-second pulses. Check the texture after every 5 pulses. You are looking for a chopped consistency, not a meat smoothie.
- Watch for Smearing: Stop as soon as the meat looks crumbly. If you over-process, the blade will begin to emulsify the fat and protein, resulting in a dense, paste-like texture that will be tough once cooked.
Overall Impression: This method is significantly better than store-bought but requires a watchful eye to avoid the dreaded “meat paste” trap.
Method 3: Hand-Chopping (The Artisan’s Choice)
For the purist who wants the absolute best texture possible—the kind served in five-star bistros—hand-chopping is the ultimate best way to grind meat.
The Process:
- The Tools: You need a heavy, razor-sharp knife. A Chinese cleaver or a large French Chef’s knife is ideal. The weight of the blade does the work for you.
- Technique: Slice the chilled beef into very thin sheets, then into matchsticks (julienne), and finally into tiny cubes. Once you have a pile of small cubes, use a rhythmic rocking motion with your knife to chop across the pile.
- The Texture Goal: You aren’t looking for perfect uniformity. The beauty of hand-chopped meat is the variation. Some bits are fine (for browning and crust), while others are slightly larger (for a steak-like chew).
- Why it Wins: Because there is no mechanical pressure, no auger squeezing the meat, and no motor heat, the fat remains 100% intact within the muscle structure.
This method is time-consuming—it can take 15 minutes to chop a single pound—but the result is a burger with a steak-like quality that no machine can truly replicate.
Comparing the Results: Which Method Wins?
| Method | Texture Consistency | Ease of Use | Cleanup Time | Best For |
| Pre-Ground | Very Dense/Compact | 5/5 | None | Quick tacos, “smash” burgers |
| Meat Grinder | Uniform & Pebbly | 4/5 | High | Large cookouts, classic burgers |
| Food Processor | Varied/Irregular | 3/5 | Moderate | Small family dinners |
| Hand-Chopped | Artisan/Steak-like | 1/5 | Easy | Gourmet burgers, Steak Tartare |
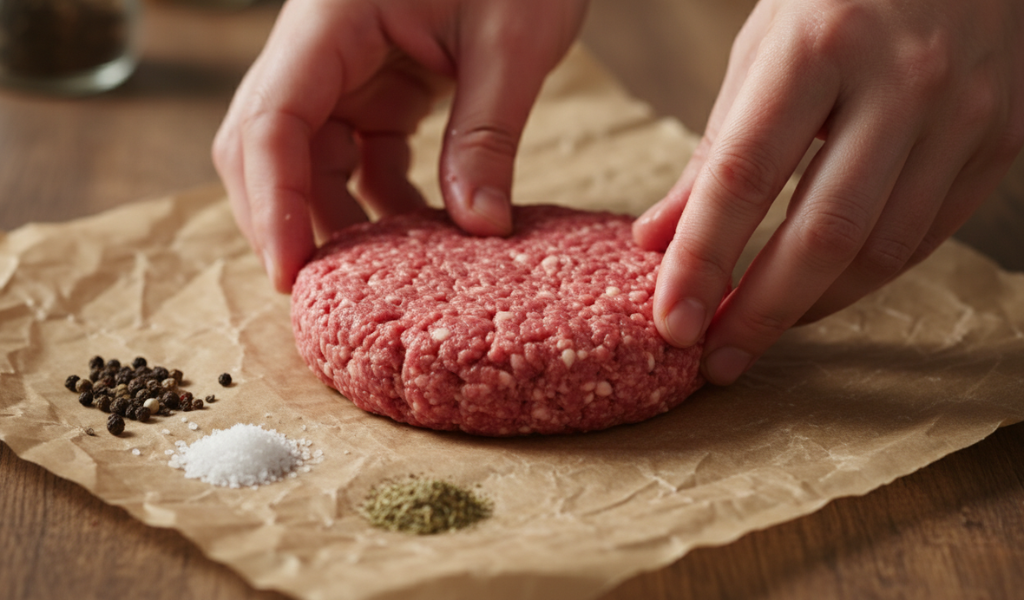
Tips for the Perfect Burger Patty
Once you have gone through the effort of a home meat grind, you must protect that texture during the patty-forming stage.
- The Gentle Touch: Think of the ground meat as a delicate cloud. When shaping your patties, use the lightest pressure possible just to get the meat to hold together. Do not knead, squeeze, or roll it into a tight ball.
- The Salt Rule: Never mix salt into your ground beef before forming the patties. Salt dissolves muscle proteins (myosin), which turns your burger into a sausage-like texture. Only season the exterior of the patty immediately before it hits the heat.
- The Dimple: Use your thumb to create a shallow well in the center of the patty. As meat cooks, the proteins contract and the center usually bulges. The dimple ensures the burger stays flat, providing more surface area for that delicious crust.
- High-Octane Heat: Whether you are using a cast-iron skillet or an outdoor grill, the surface must be incredibly hot. You want an instant sear to lock in those juices you’ve worked so hard to preserve.
Cleaning and Maintenance
Safety is a huge part of how to grind beef. Raw meat can harbor bacteria, so your equipment must be pristinely clean.
- The Bread Trick: This is an old butcher’s secret. Once you’ve finished grinding your last piece of beef, run a slice of plain white bread through the grinder. The dry bread will grab onto any lingering bits of meat and absorb the stubborn grease, pushing it all out of the nozzle.
- Hand Wash Only: Most grinder attachments are made of aluminum or carbon steel. Putting them in the dishwasher will turn them a dull, oxidized grey and may ruin the finish. Wash them in hot, soapy water.
- Rust Prevention: After washing, dry the metal parts immediately. If you have a carbon steel blade or plate, wipe it with a tiny drop of food-grade mineral oil or vegetable oil to prevent rust from forming during storage.
Final Words
Transitioning from store-bought meat to home-ground beef is perhaps the single biggest upgrade you can make in your home kitchen. It shifts the focus from “convenience” to “craft.” By choosing your own cuts, controlling the fat content, and ensuring the meat stays cold throughout the process, you are guaranteeing a meal that is juicier, tastier, and safer. Whether you use a high-tech grinder or a traditional cleaver, the effort is well worth the reward.
Would you like me to help you design a Custom Blend recipe specifically for your next BBQ, perhaps involving brisket and bacon?
Most Asked F.A.Q.
Q: Can I grind beef that has already been frozen and then thawed?
A: You can, but it is not recommended for high-end burgers. When meat freezes, ice crystals puncture the cell walls. When it thaws, it loses a lot of internal moisture (called “purge”). Grinding thawed meat often results in a mushier, wetter texture that doesn’t sear as well.
Q: Is it safe to eat home-ground beef rare or medium-rare?
A: It is generally considered much safer than store-bought ground beef. Bacteria like E. coli typically live on the surface of a cut of meat. When you buy a whole steak and grind it yourself, you are starting with a clean interior. However, any ground meat carries more risk than a whole steak, so always source your meat from a reputable butcher.
Q: What is the ideal fat-to-lean ratio for a juicy burger?
A: For most people, 80/20 (80% lean, 20% fat) is the sweet spot. If you want a truly decadent, “dripping with juice” burger, you can go up to 75/25. Anything leaner than 90/10 will likely result in a dry, crumbly patty.
Q: Why is my ground beef greyish in the center but red on the outside?
A: This is a natural process called oxidation. When beef is exposed to air, it stays bright red (bloomed). In the center of a package or a large grind, there is no oxygen, so the meat turns a natural grey-brown. As long as it doesn’t smell sour or feel slimy, it is perfectly fresh.
Q: How long can I keep home-ground beef in the fridge?
A: Freshly ground beef has a very high surface area for bacteria to grow. It is best to cook it within 24 hours of grinding. If you need to wait longer, it is better to freeze the patties immediately after forming them.
 Before discussing the technicalities of how to grind beef, we must address the single most critical factor in the entire process: Temperature. Professional butchers and culinary scientists like J. Kenji López-Alt agree that heat is the enemy of a good grind.
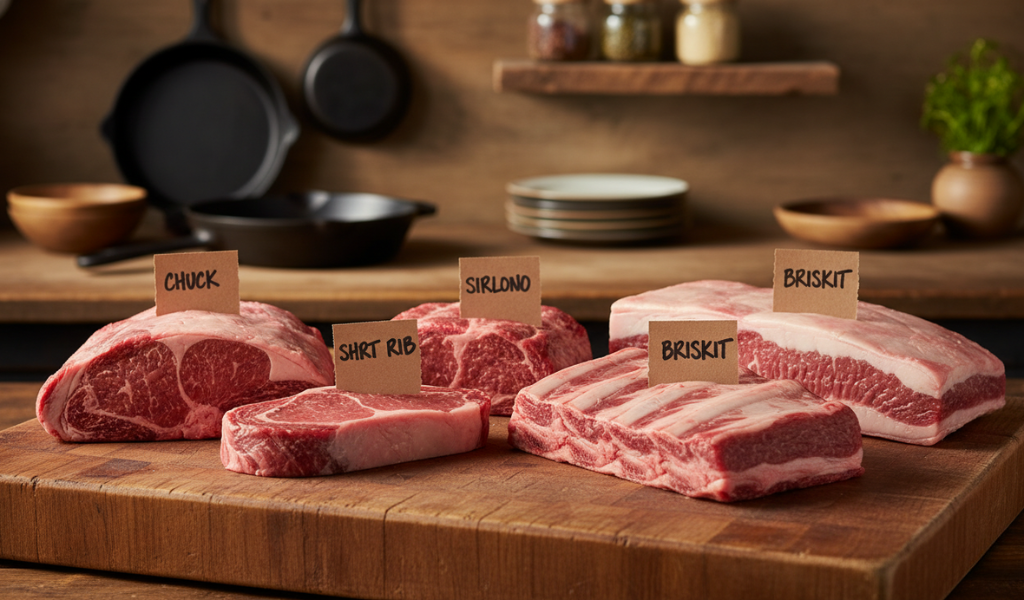
 Once you have gone through the effort of a home meat grind, you must protect that texture during the patty-forming stage.